Quantcast
Channel: ZR6AIC
Viewing all 69 articles
Browse latest View live

TISAT-1 Satellite recording log 10 Oct 2013 09 04 GMT

$
0
0

TISAT-1 Satellite recording log 10 Oct 2013 09 04 GMT


more details is available here https://directory.eoportal.org/web/eoportal/satellite-missions/t/tisat-1
and here http://www.spacelab.dti.supsi.ch/tiSat1.html


  • Downlink:  beacon frequency is 437.305MHz
  • Power: 400mW
  • Callsign: HB9DE.
    TIsat-1 periodically identifies itself by its codename TISAT radiated as Morse code (CW) at 19WPM, along with basic telemetry.

CW beacon recording CW Beacon "HI HI HI TISAT R" 
(The R at the end indicate the temperature)


Recording was done on webSDR http://zr6aic.giga.co.za:8902 on 10 October 2013 at 09:04 GMT

KKS-1 Satellite CW "5 JQ1YYY" log 10 November 2013 at 12:33 GMT

New Satellite planed for Launch in January 2014 from ISS

$
0
0
LituanicaSAT-1 with amateur radio FM transponder to deploy from ISS.
( Launch at 1:32 pm EST on Wednesday, January 8 2014)
You should be able to here this satellite on the webSDR http://zr6aic.giga.co.za:8902


This satellite will be the first Lithuanian satellite.
Payload
1) VGA camera.
2) GPS receiver.
3) UHF CW beacon 100mW.
4) 9k6 AX25 FSK telemetry TX 2 watts.
5) FM Mode V/U transponder 150mW Voice Repeater.

  • FM Transponder Uplink 145.950 MHz Downlink 435.180 MHz 
  • AX25 Uplink 145.850 MHz AX25 Downlink 437.550 MHz 
  • CW Beacon 437.275 MHz 

 Read more at http://amsat-uk.org/2013/04/12/lituanicasat-1/  , http://ly3h.epalete.com/?p=371 and here http://www.kosmonautai.lt/en/

Application Blocked by security settings (Java error when running applets in Browser)

$
0
0
Application Blocked by security settings


I have upgraded my java and the java plugin in my Chrome browser and then tried to use my webSDR website that includes applets in its content and then got this error above.

All the Google links was referring to adding the webSDR link in
Control Panel > java > Security > Edit site list. (add webSDR url http://zr6aic.giga.co.za:8901/) and  (add webSDR url http://zr6aic.giga.co.za:8902/)

Well,  this did not work for me (the default java control panel java console did not have the security options to add site links)
(I used windows 7 with a Chrome browser) and  the java was update to java 7 update 3 (build 1.7.0_03-b05) when this error above appear. :-(

I had to run the application called "Configure java"

By entering it in my start menu search and then executing the application
Configure java


I then had the application tab option as described above to added the site links.
Click on the Security tab 


Click on the Security tab and add your web url in the edit site list


Click on ok and restart you browser  and try the url with java applet.


You will then get another message box "Do you want to run this application?"


Just accept and click run and your website with applet content should now work.

hope this help


HF Antennas impedance matching.

$
0
0

HF Antennas impedance matching.

Antenna BALUNs and UNIONs
Generally a balun consists of two wires (primary and secondary) and a toroid core: it converts the electrical energy of the primary wire into a magnetic field. Depending on how the secondary wire is done, the magnetic field is converted back to an electric field..

Balun
A Balun is a device that joins a balanced line (one that has two conductors, with equal currents in opposite directions, such as a twisted pair cable) to an unbalanced line (one that has just one conductor and a ground, such as a coaxial cable). A balun is a type of transformer: it's used to convert an unbalanced signal to a balanced one or vice versa. Baluns isolate a transmission line and provide a balanced output.

In a Balun, one pair of terminals is balanced, that is, the currents are equal in magnitude and opposite in phase. The other pair of terminals is unbalanced; one side is connected to electrical ground and the other carries the signal.

The Baluns (transformer tipe) also translate impediment  differences. (450Ohm to 50m )

Some impedance matching guide lined.

  1. A (1 to 1) BALUN is mostly used with center taped Dipoles. (50 Ohm Antenna to 50 Ohm Coaxial cable)
  2. A (2 to 1) BALUN is mostly used with HF quads and loop Antennas (100 Ohm Antenna to 50 Ohm Coaxial cable)
  3. A (4 to 1) BALUN is mostly used with Off center dipoles, Windom and Sky wire loops 80m and 160m band  (200 Ohm Antenna to 50 Ohm Coaxial cable)
  4. A (6 to 1) BALUN is mostly used with Off center dipoles that is installed higher than about 25m. (300 Ohm Antenna to 50 Ohm Coaxial cable) you could also use 300 ohm robin cable and the mach it to 50 ohm.
  5. A (9  to 1) BALUN is mostly used with end fed long wire antennas.  (450 Ohm Antenna to 50 Ohm Coaxial cable) you could also use 450 ohm ladder line and the mach it to 50 ohm.

50 Ohm coaxial cable vs 450 Ohm or 600 Ohm ladder or window line?


Coaxial cable 50,75 or 92Ohm


Ladder feed line

The primary advantages of coax with respect to ladder line are
  1. Most transceivers are equipped with 50 ohm coax connectors, whereas using ladder line requires a Balun or balanced tuner
  2. Coax cable is not affected by nearby metal objects, unlike ladder line
  3. The impedance of coax doesn't change when it rains or snows, unlike ladder line
The primary advantages of ladder line with respect to coax are

  1. Lower loss at frequencies of 28 MHz and up words
  2. Easier to make connections
  3. Can drive a balanced antenna (e.g. a dipole) without a Balun


How to install SDR# SDRsharp on Windows

$
0
0

How to install SDR# SDRsharp on Windows

Goto the url http://airspy.com/download/  or http://http://airspy.com/?ddownload=3130
The old link http://sdrsharp.com/index.php/downloads
If you want to install the the RTL USB Zadig driver http://rtlsdr.org/softwarewindows

I also have added a google drive link with driver and SDR# software https://drive.google.com/open?id=0B5zipGz4ccuASC1Cd0RQMGx6Qm8

Please note you will need internet access when installing the SDR# software as it install the dependency files itself.

Select the SDR# RTLSDR Plugin to download
Select the SDR# RTLSDR Plugin to download.

Browse the directory where you have downloaded the sdr-install.zip file and unzip the file.

Unzip the file SDR-install.zip

You should have new directory next to the SDR-install.zip file called sdt-install.
Browse inside the directory SDR-install
There should be 3 files in the SDR-install directory httpget.exe, install.bat and unzip.exe


Run the install.bat by double clicking on the file install.bat. (make shore you have internet access before running this script)
You should see a black console appearing that will download the additional files required by SDR#
This download process could take a long time depending on your internet connection.
You mite get a security warning when you run the install.bat (just except the warning)


Black DOS console. (you need internet connection during this bat instillation as more files get download during this procedure)

Install.bat console installing application
The console will close when its complete.
There should be a new directory called sdrsharp.

If you use the latest SDRSarp the procedure is a bit different see screenshot below.
Run the Install-rtlsdr.bat to install the drivers.


Goto this directory and run the application called SDRSharp.exe (double clicking on it)

goto sdrsahap directory and run SDRSharp.exe

The SDRSharp application should be started.
Depending on how you connect to the RTL dongle you should select the correct option in the "Other sound card" pull down menu next to the play button.
There should be two options.
1)RTL-SDR/USB (This option is if you have the USB driver installed and the rtl dongle is connected directly on to PC or laptop port) zadig usb driver http://rtlsdr.org/softwarewindows
2)RTL-SDR/TCP (This option is when you want to connect to a remote RTL_TCP server and you then need to enter the server IP and Port) default is the same server 127.0.0.1:1234


If all went well you can now hit the Play button and you should here sound.
Mite have to set the volume in you sound mixer properties.


New Amateur radio Cubesats will be launched from the International Space Station on Thursday, February 6, 2014.

$
0
0

New Amateur radio Cubesats will be launched from the International Space Station on Thursday, 6 February 2014. ( 18:07 UTC) new date (February 28 at 07:30 UTC)

1) LituanicaSat-1 (

  • Onboard VGA camera
  • GPS receiver.
  • UHF CW beacon 100mW, 9k6 AX25 FSK telemetry TX 2 watts.
  • FM Mode V/U transponder 150mW Voice Repeater.
  • 145.950 Mhz Uplink FM transponder.
  • 435.180 MHz Downlink FM.
  • 145.850 MHz AX25 Uplink.
  • 437.550 MHz AX25 Downlink.
  • 437.275 MHz CW Beacon .
  • https://www.facebook.com/Lituanicasat1
2) LitSat-1


  • Beacon/TLM down link 145.850 MHz
  • Beacon RF packets are AX.25 UI frames https://www.tapr.org/pub_ax25.html Main parameters of the beacon frames are: TX baud rate 9600 bps (G3RUH), repetition period ~4.5s, beacon duration ~0.5 s, source call address – TNC, destination call address – LY1LS.
Linear Transponder details
  • Uplink 435.150 MHz LSB 
  • Downlink  145.950 MHz USB 
  • Bandwidth ±15 kHz from centre
  • CW beacon   435.1375 MHz (LY1LS/B)
  • Normal mode – transponder, beacon OFF
  • 437.550 MHz AX25 Uplink.
  • 145.850 MHz MHz AX25 Downlink.
  • LitSat-1 on Facebook https://www.facebook.com/palydovas

3) UAPSAT


4) ArduSat-2


5) UKube-1
The Ukube-1 Satellite was lunched on 8 July at 18:32:42 UTC. kep details at http://www.dk3wn.info/p/?p=46812UKube-1 CW was confirmed over Europe ;-)


UKube-1 communications subsystem:
• Telemetry downlink 145.840 MHz
• FUNcube subsystem beacon 145.915 MHz
• 400 mW inverting linear transponder for SSB and CW
- 435.080 -435.060 MHz Uplink
- 145.930 -145.950 MHz Downlink
• 2401.0 MHz S Band Downlink
• 437.425-437.525 MHz UKSEDS myPocketQub Downlink


Installing Zadig USB driver for RTL_dongle on windows 7

$
0
0

Installing Zadig USB driver for RTL_dongle on windows 7

Download the Zadig USB driver file from http://sourceforge.net/projects/libwdi/files/zadig/
If you don't have 7zip unzip program also download it from http://www.7-zip.org/
Here is where I install the 7Zip program


Here is where I use the 7zip program to unzip Zadig file that I have downloaded.


Unzip die the zadig_v2.0.1.160 (1).7z file and you should be left with the following file Zadig.exe
Plugin your RTL USB dongle.

I then Ran the Zadig.exe program


Select the Option menu and then all Devices.


Then select the Buil-in Interface (interface 0) and then replace driver or install driver


You will the get a warning  select the Install driver software anyway.


You should see a dialog box saying the driver was installed successfully,


Then unplug the USB RTL dongle wait for 5 seconds and reconnect the dongle.

Download the ExtIO_RTL.dll and copy it to the sdrSharp directory. ( I think the new SDRSharp version comes with the DLL) https://github.com/josemariaaraujo/ExtIO_RTL/raw/master/Release/ExtIO_RTL.dll

If you haven't installed the sdrSharp program before follow my instructions here http://zr6aic.blogspot.com/2014/01/how-to-install-sdr-sdrsharp-on-windows.html in how to do that.

If you have installed the SDRSharp software before then just select the RTL-SDR/USB in the option menu and you then  select start.
if all went well the SDR# should work now. ;-) "Have fun"


Here is the video of the SDR# connecting to RTL_TCP on Raspberry Pi.


How to run Android Applications on your windows Desktop (BlueStacks)

$
0
0

How to run Android Applications on your windows Desktop

Don't you have a favorite applications on your Android phone / Tab and you wish you could run it on your windows desktop. Well you can. ;-).

Bluestacks Android Desktop.
So how do you do it ?

Click on Download xp visa windows green icon
Install the downloaded Application called  BlueStacks-SplitInstaller_native.exe

Here is the direct URL http://cdn.bluestacks.com/public/beta-1/BlueStacks-SplitInstaller_native.exe

You will the see this screen. (except conditions and select continue)
Select continue


You will need the first two options to install your favorite application on the BlueStacks desktop.

Installing the BlueStacks form internet. (some flashing adverts while installing)
I the got a worming about screen driver that was outdated and needs to be updated.

Graphics Warning menu

Installing Graphics driver.

Graphics driver install menu
After you have installed the application you should have a menu item in your start menu Start BlueStack

Run the Start BlueStacks menu item

You will then get a Android Tab desktop on your screen.

BlueStacks Tab Desktop

Wait a white the Desktop connects to the internet to download the default applications.

Install your Apps 

Enable your Google sink and apps-store functionality in stetting.

Install your favorite applications. (in my case Pocket RXTX from app store)


Here is my favorite webSDR Application where I listen to my HF stations on my desktops.

Pocket RXTX SDR radio on your virtual TAB
Here is a link to this app https://play.google.com/store/apps/details?id=ro.yo3ggx.rxtx&hl=en

If you want to connect you RTL dongle or VNA device to your PC and make it work you can here is the details.

Because Bluestacks currently do not support the USB or Bluetooth devices, you need a COM redirector application, a trail version of tcp2com program which can be downloaded for free from here:
http://www.astrogeeks.com/AstroGeeks/COM2TCP/download.html (a trial for 45 days).
Some other free redirectors are available too.

Then you need to run BlueVNA in WiFi mode and connect to the local host, using the port configured in the COM redirector.

Baofeng HT Radios

$
0
0
Baofeng HT Radios. (UV-5RA) 2m (136-174Mhz) and 70cm (400-480Mhz) with a additional FM broadcast band Rx only (65-108Mhz) (the Transmitting power is (1 Low/4W High).
This radio should be ideal for Satellite work but it is not full duplex ;-(

Baofeng UV-5RA
Transceiver is available from http://www.giga.co.za
I have heard a lot about the small Baofeng HT radios and I was wondering how well they work.
Firstly when I looked around on the internet I found a whole range of the Devices with minor differences between them.

Here is some comparison differences I could found.

Radio ModelDual bandMemory ChannelsFrequency range(s)Battery PowerTx PowerBattery
UV-5RYes128136 to 174 MHz and 400 to 480 MHz12 hours4/1W1800-mAh
UV-3RYes99136 to 174 MHz and 400 to 480 MHz broadcast band 68 to 108 MHz(RX)10 hours3 W1800-mAh
UV-5RAYes128136 to 174 MHz and 400 to 480 MHz broadcast band 68 to 108 MHz(RX)12 hours4/1W 1800-mAh
BF-888SNo16400 to 470 MHz8 hours4W1500-mAh
UV-100Yes99136 to 174 MHz and 400 to 470 MHz Broadcast band 65 to 108 Mhz(RX)10 hours2W1200mAh
UV-B5Yes99136 to 174 MHz and 400 to 470 MHz12 hours5/1W1800-mAh
UV-5RCYes128136 to 174 MHz and 400 to 480 MHz broadcast band 68 to 108 MHz(RX) ??4/1W1800-mAh

Well I was surprised with the UV-5RA that I got and was reasonably easy to configure and program.
I got the repeater split set-up in no time after watching a YouTube video.

Here is the Microphone and external speaker connection details.

Both the modules is available from Giga Technology http://www.giga.co.za

Programming cable assembly.

Programming cable assembly.


Programming your Baofeng radio (UV-5R?)

Frequency Mode vs. Channel Mode
These two modes have different functions and often confused. 

  • Frequency Mode - Used for a temporary frequency assignment, such as a test frequency or quick field programming. 
  • Channel Mode - Used for selecting preprogrammed channels. 

All programming MUST be initially done in the Frequency Mode using the Upper Display only. From there you have the option of assigning the entered data to a specific channel for later access in the Channel Mode if desired.

IMPORTANT: Programming done using the Lower display cannot be saved and will be lost.  


Programming a Repeater Channel with Standard Offsets (600kHz minus offset)
  
This example is for:  146.700 MHz
600kHz minus offset
into channel 99
CTCSS tone 123.0

1.    Set radio to VFO Mode   (Frequency Mode)
      a.)     UV5R series - Press VFO/MR button
      b.)     UV82 - Turn radio OFF, then Press/Hold MENU button during PowerON.

2.    Select   Display A    (this is a must)
      a.)     UV5R/GT3 - Press     [A/B]     and select the Upper Display.
      b.)     UV82 - Press [EXIT A/B] and select the Upper Display.

3.    Disable TDR (Dual Watch/Dual RX) which toggles between A and B.
          Press  [Menu]   7   [Menu]
          Select OFF
          Press  [Menu]   [Exit]

4.    Delete Prior Data from the channel to be programmed.
          Press  [Menu]   2 8   [Menu]
          Enter   9 9  (Memory Channel to clear)
          Press  [Menu]   [Exit]

5.    Enter the Repeater Offset.
         Press [Menu]   2 6   [Menu]
         Enter  0 0 6 0 0
         Press  [Menu]   [Exit]

6.   Enter the Transmit Frequency Shift.
        Press  [Menu]   2 5   [Menu]
        Enter  2 for Minus shift. ( or    to  - )
        Press  [Menu]   [Exit]  

7.   Set CTCSS or DCS codes for Transmit. 
         ( example = CTCSS TX tone 123.0 Hz )
            Press  [Menu]   1 3   [Menu]
            Enter  1 2 3 0   [Menu]   [Exit]

8.   Enter the repeater output frequency,  1 4 6 . 7 0 0 

9.   Store RX frequency
        Press  [Menu]   2 7   [Menu] 
        Enter   9 9  (Memory Channel)  ( 000 to 127 )    
            This is the channel that was cleared in step 4. 
        Press  [Menu]   [Exit] 

10.  Press the [ * Scan ] button.     
         This activates  Reverse Mode and displays the TX frequency.

11.   Press  [Menu]   2 7  [Menu] 
         Enter the same Memory Channel entered above. 
         Press  [Menu] 

12.   Press the  [* Scan] again to exit the Reverse Mode.

13.   Press  [Exit]

This will now appear it in the channel list when you switch to Channel Mode. (MR)
Boafeng UV-VF5 Circuit diagram

REF http://www.uv3r.com/images/Schematic-Baofeng-UV5R.pdf

Radio programing details
here is a link to the Chirp program http://chirp.danplanet.com

Which antenna is best?

 It's all personal preference, but a good rule of thumb is:
 The longer the radiator, the better the range, especially on transmit.
 Short stubby antennas use a coil to match TX to 50 ohm, not radiate.
 The closer to 1/4 wavelength in the air, the better the performance.

NOTE:
      A field test was performed between 31 popular antennas.
     The results can be found HERE.   

Satellite Log of MOVE1 CW (2 March 2014 08:02 GMT)

What a satellite frenzy

$
0
0

What a satellite frenzy.


Satellite prediction software Gpredict

Not more that a year ago you would not have seen anything like this. Its satellite heaven.

I was looking at the Gpredict screen this morning and could not believe what was happening.

There was 5 Amateur Satellites (ZACUBE-1, FUNCUBE, EAGLE2,DELFI-N3XT,CUTE-1.7  ...) above me and I had a quick look at the webSDR and could see multiple beacons all over the screen. Well there is now no excuse not to work satellites. You can pick and chose, Packet store and foreword FM transponders and Linear transponders, some even have cameras on board. What fun!. Some of the Satellites like the FM transponders can be communicated with a simple HF handheld transceiver. ($50 max)

Enjoy the Satellites.

WREN The small 5X5X5cm Cube Satellite. (PocketQube)

$
0
0

WREN The small 5X5X5cm Cube Satellite.


The tiny PocketQube satellite WREN is just 5x5x5 cm yet is equipped with a camera for Slow Scan TV (SSTV) using the Martin-1 format, a gyro, a magnetic field sensor, momentum wheels and pulsed plasma microthrusters. The camera has an image processing system which can find the position of the Sun and the Earth automatically.
WREN Beacon on webSDR (http://zr6aic.giga.co.za:8902


Payload.
1) Beacons on 437.405 MHz (+/- 10 kHz Doppler shift)
Satellite sends 1.6 seconds in AFSK. Then it waits for 6 minutes for a signal.
It waits for a silent FM signal and Morse-like code. (So just keying the mike by hand will do.)
1 = long    0 = short
110011 = Activate (Wait for answers within 2 seconds)11111 = Camera on110 = Snapshot/Thumbnail (make image with 12x14 Pixels)110100 = SSTV send in Mode  Martin-1 with 320x240 PixelsNo, there is no self destruct code. 
The Telemetry Decoder and an Audio File of the beacon are available at http://we.tl/TkWEuhIlnF


WREN Decoder/Commander App Download https://www.dropbox.com/sh/pvzyr01216dab1k/uf4MQWEn5y

More details is available at http://amsat-uk.org/2013/11/28/commands-for-wren-sstv-released/
and https://www.facebook.com/StaDoKo


After a wonderful day at the SA AMSAT satellite symposium I have learned the following.

$
0
0
After a wonderful day at the SA AMSAT satellite symposium I found the following very interesting. (24May2014)
http://www.amsatsa.org.za/
  1. KLETSkous the 1U Cubesat build by volunteer Amateur Radio operators.


The planned payload for KLETSkous will be as follows.

  • A Linear transponder (2m uplink and 70 cm downlink)bandwidth of 20 kHz
  • Currently the frequencies in the 435.100 to 435.140 MHz range are considered for the uplink and 145.860 to 145.980 MHz for the downlink
  • The scientific payload will be a experiment analysing "Worm Holes" (This experiment will try and find the portholes between Sun and Earth).
  • There was a live Transponder demo and a prototype of the space frame.


More information is available at http://www.amsatsa.org.za/


2) A presentation on the progress of the experiments on ZACube-1 was also very interesting.
ZACUBE-1 Cube sat Picture

  • Very nice pictures were captured from the VGA cameras.
  • Beacon TX power was also increased and should be easier to capture the signals.
  • They are now slowly deploying the long wire HF antenna in the following few weeks to enable the HF experiments.
More info available at http://www.cput.ac.za/blogs/fsati/zacube-1/

3) A presentation on the experiments of a Satellite propulsion system (Vacuum Arc Thruster)
Vacuum Arc Thruster
  • Vacuum arc thrusters are a potentially useful technology for use as microthrusters on microsats for the future.
  • It is basically a spark plug that generate sparks in a vacuum to propel the satellite. by (Jonathan Lun PhD Student SANSA Space Science,University of the Witwatersrand)

Useful Linux Commands

$
0
0

Useful Linux Commands

Linux

Disk space

Free disk space
  • df -k Mounted disk list 
  • df -h - shows disk free info 
  • du -sh - shows information about utilisation 
  • du -sk * | sort -n - what files/directories are using the most storage

What is taking up disk space?

  • find / -type f -size +100000k -exec ls -lh {} \; | awk '{print $5 ": " $NF}'

Find Folder size, sorted.

  • du * -sh | sort –nr

Remove specific files recursively

  • rm `find . -name '*.log'` -rf

Finding files
Finding files by filename
  • find / -name mystuff 
Note: this ignores symbolic links
Finding files by content


  • grep -H -r “the text” /home/tom 
Finding strings in file recursively looking through directories

  • find ./ |xargs grep -i StringToFind 
Finding the process that access a log file
  • fuser -m -u /var/log/logfile.log

Networking

What is blocking the local port?
  • netstat -tlnp | grep 50101
Finding the application that is using the port
  • lsof | grep 50101
Finding the application that is using the port
  • fuser -v -n tcp 80
  • netstat –i – list all the interfaces (including bonded interfaces)
  • netstat –s – summary statistics - dropped packets, retransmissions
  • netstat –l – show listening sockets - who’s got what port open
  • netstat –t – show active connections - who’s connected
  • netstat –r – show the routing table used by the kernel - what routes are currently loaded
  • ss -no state established '( dport = :8999 or sport = :8999 )' - who is connected to/from port 8999
  • ss -pmn (processes, memory, numeric – don’t resolve) (su to pricing) - show the process and memory info of each socket
With this command and its different options one can obtain statistics as well as configure any network adapter connected in the system.
  • ifconfig [devicename] [reqd. action] [options] :
example : To assign IP Address to a network adapter.
  • ifconfig eth0 192.168.1.1
whois [options] <arg[@server]> : Queries the WHOIS database, to retrieve available information about the given server / domain-name. example : To obtain information about a domain, suppose google.com.
  • whois google.com
ping [options] [host-address/name] : This command sends Internet Control Message Protocol (ICMP) to the specified network host. example : To ping a network host "192.168.1.1"
  • ping 192.168.1.1
netstat [options] : Gives information about the all the network connections established by the system through different ports. -t : Displays only TCP socket connections -a : Displays all the sockets that is listening and non-listening ones For example :
  • netstat -a
traceroute [options] [host-name/address] : Displays identity of hosts visited by the packet while routing from its source to destination. -n : This option disables the DNS lookups for the IP Addresses example :
  • traceroute 192.168.1.1
route [options] [destination host-name/address] : Displays as well as allows to manipulate the IP routing table. -n : Displays IP addresses as by default hostnames are displayed example : The command below displays the numerical IP addresses in the IP routing table
  • route -n
telnet [options] [host] [port_number] : Does an interactive communication with another host through TELNET protocol on the specified port number. By default it uses TCP port number 23 and the connection is not encrypted. -l : specify user name to login as on the remote system example : To login into remote host 192.168.1.1 in username "abc"
  • telnet -l abc 192.168.1.1
ssh [options] [username@host-address] : Enables a user to make secure remote login to the specified host address. -C : Compresses the data which sent over the connection to specified host -X : Enables the user to use X server features. example : In order to ssh to host 192.168.1.1 with username "abc" following is the command.
  • ssh -X abc@192.168.1.1
scp [options] [username@host-address:file_location] : Enables a user to make secure copy of the file to the specified host-address. -r : Recursively copies the data in directories -C : Compresses the data which sent over the connection to specified host example : In order to scp file.txt to host 192.168.1.1 with username "abc" following is the command.
  • scp file.txt abc@192.168.1.1:~\
wget [options] [URL] : Performs HTTP request from through the shell to get data from the URL -r : Get the URL and all its links in recursive manner
  • wget http://www.google.co.za

iptables [options] : This command requires root permission. It enables to carry out packet filtering and Network Address Translation. -F : Flush set of rules -n : Show rules without carrying out DNS lookups -A : Appends one or more rules to the end of the selected chain. -j : Specify the target of the rule -s : specify source -L : Current rules are listed For example : To block packets from certain IP Address 192.168.1.1, can be done by
  • iptables -A INPUT -s 192.168.1.1 -j DROP
tcpdump [options] : Outputs the contents of packets on the network interface. It can also output only certain packets based on the condition provided.
-i ether0 to select the interface you what to monitor
  • tcpdump -i ethe0

How To Find My Public IP Address From Command Line On a Linux

  •  dig +short myip.opendns.com @resolver1.opendns.com

Processes

  • top : The top program provides a dynamic real-time view of a running system.
  • mpstat : writes to standard output activities for each available processor. Repeat every second : "mpstat 1"
  • ps : Display all running processes (eg : to list java processes = "ps -ef | grep java" )
  • pgrep : Looks through the currently running processes and lists the process IDs which matches the selection criteria to screen
  • pstree : shows running processes as a tree
  • netstat : displays network connections (both incoming and outgoing), routing tables, and a number of network interface (network interface controller or software-defined network interface) and network protocol statistics (the very useful "-p" option is not allowed in PROD unless you're root)
  • htop : Show all CPU running process (For mutilator CPU)
Find threads/handles for all users
  • ps -eLf 
Total counts on threads/handles for all users
  • ps -eLf | wc -l

kill

  • Never use kill -9 if you can help it
  • You can send any signal you like (use kill -l to list them) SIGUSR1 and SIGUSR2 are user defined. Each signal has a default action, e.g. to temporarily interrupt or to terminate the program

 strace - system trace

  • strace -p 25292 -f : trace pid 25292 in real time
  • strace -p 25292 -f -c : trace pid 25292 and report summary statistics on exit

How to use VI editor.

INSERT Mode

For adding text to a file  ( press Esc and then below command)  . The three most common ways to enter the Insert Mode are:
LetterAction
iStarts inserting in front of the current cursor position
IStarts adding at the front of the line
aStarts adding after the cursor
AStarts adding at the end of the line
oStarts opening a new line underneath the cursor
OStarts opening a line above the cursor.
<Esc>Gets out of Insert Mode

EDIT Mode

Generally for moving the cursor and deleting stuff.
In the Edit Mode, the keys do not type letters, but do other actions such as cursor movement, deletions, copying lines, etc.
LetterSimple Cursor Movement
hMoves cursor left one spaceNote: the Arrow keys do work locally, but sometimes mess up over a network.
jMoves cursor down one line
kMoves cursor up one line
lMoves cursor right one space
Fast Cursor Movement
wMoves the cursor a full word at a time to the right
bMoves the cursor back to the left a word at a time
^Moves the cursor to the front of a line
$Moves the cursor to the end of a line
<ctrl>fMoves the cursor forward a full page of text at a time
<ctrl>bMoves the cursor backward a full page of text at a time
Modifying Text
xDeletes the character under the cursor
ddDeletes the line where the cursor is located (type d twice!)
n ddDelete n consecutive lines ( n is an integer)
rReplaces the character under the cursor with the next thing typed
JJoins current line with the one below (Capital J!)
uUndoes the last edit operation
<ctrl> rRedo (Undoes the last undo operation)
Cut and Paste Operations
yyCopies or yanks a line ( 5yy yanks 5 lines)
pPuts the yanked text on the line below the cursor (lower case p)
PPuts the yanked text above the current line (capital P)
Note: If vi is already in the input mode, text from that or another window may be highlited using the left mouse button, and copied into place by pressing the middle mouse button.

COMMAND Mode

For interacting with the operating system. To enter the Command Mode, a colon “ : ” must precede the actual command.
LetterAction
: r <file>reads a file from disk into the vi editor
: w <file>writes current file to disk
: wqwrites the file and quits vi
: q!quits without writing (useful if you’ve messed up!)

Log of POPSAT-HIP1 Cubsat CW beacon on webSDR http://zr6aic.giga.co.za:8902

$
0
0

Log of POPSAT-HIP1 Cubsat CW beacon on webSDR http://zr6aic.giga.co.za:8902 CW Message  POPSAT EXPT25DC 7.74V ?0C


Here is the recording of the POPSAT-HIP1 Cubesat on 24 September 2014 at 9:26 GMT.

This recording was done on frequency 437,395Mhz Modulation set to FM CW


To access the webSDR click here http://zr6aic.giga.co.za:8901

log PSAT cubesat 25 September 18:20GMT (APRS)

$
0
0
ParkinsonSAT (Psat) cubesat 25 September 18:20GMT

CW message from PSAT Cubesat.  "PSAT EVPT32DC 7.23V" , "PSAT EXPT32DC 7.24V 0DBM" , "PSAT EXPT32DC 7.25V 0DBM"


Psat is the next APRS satellite design from students at the US Naval Academy. Although we have built 5 previous APRS satellites, only the original PCSAT-1 is still in orbit because all the others were deployed from the Shuttle and at the low altitude, have re-entered. PCSAT-1 (W3ADO-1) is partially operational when ever sun angles are optimum a few times a day; and you can see its live downlink on http://pcsat.aprs.org.


APRS herd by PCSAT
more info available at http://www.aprs.org/psat.html

Setting up my 30m APRS on HF using Quisk SDR, Soundmodem and Xastir on Linux.

$
0
0

Setting up my 30m APRS on HF using Quisk SDR, Soundmodem and Xastir on Linux.


Here is how I conferred my HF APRS gateway from a HF SDR. (30m Softrock SDR)

30m APRS hardware

1) Install QUISK  (SDR software) on on Linux.

2) Install Alsa loop. (loopback sound driver)
3) Install Soundmodem.  (AFSK Modem)
4) Install Xastir. ( APRS IGate and map viewer)


So lets begin.

1) Install QUISK  (SDR software) on on Linux.

The Quisk instillation need Python so you will have to install the following first.
Install the following packages.
sudo apt-get install python2.7, python2.7-dev, python-wxgtk2.8, fftw3-dev, libasound2-dev, and portaudio19-dev.

goto your Downloads directory. ( or you favorite directory)

cd Downloads
Download the Quisk application from if you want the latest version at http://james.ahlstrom.name/quisk/docs.html (quisk-3.4.4.tar.gz tar -xvf and then run quisk.py you need python ass seen above) or you could run the command  sudo apt-get install quisk


Here is the instructions if you get the latest version

 sudo apt-get install quisk
wget http://james.ahlstrom.name/quisk/quisk-3.6.18.tar.gz
unzip the quisk source code
tar -xvf quisk-3.6.18.tar.gz
there should now be a directory quisk-3.6.10
goto quisk-3.6.10 directory
cd quisk-3.6.10
Compile the quisk application
sudo make
sudo make install
you now need to create a configuration file for quisk to see your Softrock lite II sdr sound input IQ signal.
Create a text file with you favorite text editor and copy the text below and save it as 30m_aprs_quisk_conf_sdriq.py


#*****************************************************

# These are the configuration parameters for Quisk using the
# SDR-IQ by RfSpace as the capture device.

# Please do not change this sample file.

# Instead copy it to your own .quisk_conf.py and make changes there.
# See quisk_conf_defaults.py for more information.

from sdriqpkg import quisk_hardware             # Use different hardware file


# In ALSA, soundcards have these names:

#name_of_sound_play = "hw:0"
#name_of_sound_play = "hw:1"
#name_of_sound_play = "plughw"
#name_of_sound_play = "plughw:1"
#name_of_sound_play = "default"

use_sdriq = 1                                   # Use the SDR-IQ

sdriq_name = "pcm.sdrXonarD1Record12"
sdriq_clock = 66666667.0                # actual sample rate (66666667 nominal)
sdriq_decimation = 1250                 # Must be 360, 500, 600, or 1250
sample_rate = int(float(sdriq_clock) / sdriq_decimation + 0.5)  # Don't change this
name_of_sound_capt = ""                # We do not capture from the soundcard
name_of_sound_play = "hw:0"            # Play back on this soundcard need s to be loopback device
playback_rate = 48000                   # Radio sound play rate
channel_i = 0                                   # Soundcard index of left channel
channel_q = 1                                   # Soundcard index of right channel

display_fraction = 0.85                 # The edges of the full bandwidth are not valid
#***************************************************************

Then save the file.
We now need to setup the ALSA sound system to map the alsa audio coming into the server to a friendly name "pcm.sdrXonarD1Record12" see above config file.
Run the command sudo arecord -l it will list all the ALSA audio input devices.

 sudo arecord -l
**** List of CAPTURE Hardware Devices ****
xcb_connection_has_error() returned true
Home directory /home/anton not ours.
card 0: D1 [Xonar D1], device 0: Multichannel [Multichannel]
  Subdevices: 0/1
  Subdevice #0: subdevice #0
card 1: PCH [HDA Intel PCH], device 0: VT1708S Analog [VT1708S Analog]
  Subdevices: 2/2
  Subdevice #0: subdevice #0
  Subdevice #1: subdevice #1
card 2: D1_1 [Xonar D1], device 0: Multichannel [Multichannel]
  Subdevices: 0/1
  Subdevice #0: subdevice #0
card 3: M44 [M Audio Delta 44], device 0: ICE1712 multi [ICE1712 multi]
  Subdevices: 0/1
  Subdevice #0: subdevice #0


Please note I have multiple sound cards in my Linux server so you might not have as many interfaces listed as mine above.

Identify the your sound card in the list.

in my case it is :card 3: M44 [M Audio Delta 44], device 0: ICE1712 multi [ICE1712 multi]
You now need to configure the ALSA system to map the name of quisk to this card and you do it in the ALSA config file in your user home directory. (in my case it is /home/anton)

cd to go to your home directory

pwd To list your home directory

/home/anton
edit the following ALSA audio mapping file with you favorite text editor .asoundrc  (note the dot in front of the name it means its hidden) I use VI as an editor


 vi .asoundrc

Add the following and change the names relevant your sound card name (RED)

#************************** pcm definition ************************************
pcm.sdrM44_card {# defining the card to be used
     type hw
     card M44 # this has to be done to force reboot to point to same cards
}

#************************* controller section ***********************************
ctl.sdrM44_card {#defining the control interface
     type hw
     card M44 # this has to the same as above

     }
#****************************** recording ***********************************
pcm.sdrM44Record12 { # input input 1 and 2
     type plug
     slave {
     pcm "dsnooper_M44"
     channels 4
     }
         ttable.0.0 1
         ttable.1.1 1
}


Run the quisk with your costume configuration  with the full path to the configfile

sudo quisk -c /home/anton/Downloads/quisk-3.6.10/quisk_conf_softrock_iq.py


Now we need to setup the ALSA loop back audio interface for Quisk to send the USB demodulated audio to Xastir or Fldigi or what ever modem device you are using.

2) Install ALSA loop. (Loopback sound driver)


To check if it is already installed in the ALSA device driver.
run the command sudo arecoed -l 

If you see the loopback devise skip this section below and go section 3

Compiling snd-aloop if needed

Update: it may not be needed any longer as of kernel 2.6.38 ...

It may well be that the ALSA Loopback kernel module was not included in your distribution's kernel package (it is the case in e.g. debian, as far as I know). This is no bother as we can easily compile it. Note that there is no way around since the loopback ALSA module is not part of the kernel baseline in general. So unless your kernel packager had done the following work, you will have to do it yourself ...
Warning: I tried alsa-driver 1.0.21 against 2.6.33.5-rt22 and while it compiled fine, it would not load at all, even when forced. So don't waste your time with this version combo.
Make sure you really don't have it installed. Better check that not :)
sudo modinfo snd-aloop
If modinfo reports nada, time to check that you have installed the kernel headers corresponding to your presently running kernel. I'll leave this to you as this is very distro dependent. In debian based distros, the package is called something like linux-headers-xxx and must match the installed kernel (package linux-image-xxx).
Time to make a backup of the installed kernel modules. Example:

cd
mkdir backup
cd backup
cp -a /lib/modules/`uname -r`/kernel/sound .


Prerequisite: you of course need a compiler and other tools. In debian based distros, you can check that you have a package called build-essential installed:
dpkg -l build-essential
If not, just get it:
sudo apt-get install build-essential

Now grab the alsa-driver source code (same version as your installed ALSA, in my case 1.0.23 which I will use in my description) from the The ALSA website, uncompress, untar it and cd to the alsa-driver top dir. Here is a command summary

cd
mkdir source
cd source
wget ftp://ftp.alsa-project.org/pub/driver/alsa-driver-1.0.23.tar.bz2
tar jxvf alsa-driver-1.0.23.tar.bz2
cd alsa-driver-1.0.23


Now you have to configure the source package for compilation. To help you, look at what ALSA modules are currently loaded:
cat /proc/asound/modules

make
sudo make install

It will normally install all the compiled modules into the correct location of your kernel installation. Now check that the kernel knows about the loopback module:

~$ sudo modinfo snd-aloop
filename: /lib/modules/2.6.32/kernel/sound/drivers/snd-aloop.ko
license: GPL
description: A loopback soundcard
author: Jaroslav Kysela <perex@perex.cz>
srcversion: B85A5847D027749DCF96195
depends: snd-pcm,snd
vermagic: 2.6.32 SMP preempt mod_unload modversions CORE2
parm: index:Index value for loopback soundcard. (array of int)
parm: id:ID string for loopback soundcard. (array of charp)
parm: enable:Enable this loopback soundcard. (array of bool)
parm: pcm_substreams:PCM substreams # (1-8) for loopback driver. (array of int)


Now lets load it. But before that, shut down all audio apps (including firefox). Once done, do this:
sudo modprobe snd-whatever-module-you-need
sudo modprobe snd-aloop
sudo alsa force-unload


Now, see if it works: ~$ lsmod | grep aloop snd_aloop 4732 0
snd_pcm 57065 6 snd_aloop,snd_hdsp
snd 40404 18 snd_aloop,snd_hdsp,snd_pcm,snd_hwdep,snd_rawmidi,snd_seq,snd_timer,snd_seq_device

If all was ok then add snd-aloop in /etc/modules. (If you wish, you can give the loopback soundcard another name than "Loopback" in a modprobe option but I kept the default throughout the entire HOWTO and there is no need to change it.)
In case anything went wrong and you wish to go back to your previous ALSA installation, no problem:


sudo rm /lib/modules/`uname -r`/kernel/sound sudo cp -a ~/backup/sound /lib/modules/`uname -r`/kernel/ sudo alsa force-reload

there should be two new ALSA devicess 


This virtual sound card consists of 2 devices:
hw:Loopback,0
hw:Loopback,1
to see if the loop back connector is active run the command aplay -l or arecord -l


sudo arecord -l

**** List of CAPTURE Hardware Devices ****
xcb_connection_has_error() returned true
Home directory /home/anton not ours.

card 4: Loopback [Loopback], device 0: Loopback PCM [Loopback PCM]

  Subdevices: 8/8
  Subdevice #0: subdevice #0
  Subdevice #1: subdevice #1
  Subdevice #2: subdevice #2
  Subdevice #3: subdevice #3
  Subdevice #4: subdevice #4
  Subdevice #5: subdevice #5
  Subdevice #6: subdevice #6
  Subdevice #7: subdevice #7
card 4: Loopback [Loopback], device 1: Loopback PCM [Loopback PCM]
  Subdevices: 7/8
  Subdevice #0: subdevice #0
  Subdevice #1: subdevice #1
  Subdevice #2: subdevice #2
  Subdevice #3: subdevice #3
  Subdevice #4: subdevice #4
  Subdevice #5: subdevice #5
  Subdevice #6: subdevice #6
  Subdevice #7: subdevice #7

if you did see the above loopback then you are ok and we can just add the loopback configuration to the 30m_aprs_quisk_conf_sdriq.py file as above.

edit the file 30m_aprs_quisk_conf_sdriq.py
and make shore the it has the following.
name_of_sound_play = "hw:0"            # Play back on this soundcard need s to be loopback device
select the configeration button on quisk to see if the loopback is working fine.


Now we can configure Soundmodem and Xastir to decode our HF APRS....

3) Install Soundmodem. (AFSK Modem)

Instillation of soundmodem
sudo apt-get install soundmodem

We now need to configure the soundmodem and this can easily be done with guide.
sudo soundmodemconfig


Set up the ALSA audio driver and point it to the loopback interface we have configured above " plughw:Loopback,1,0"


Create a new channel by write clicking on the previous configuration that was created and selecting new channel.

Select KISS and then enter the serial device file /dev/soundmodem0

Select Modulator and set the bits 300 board  and Frequencies to 900Hz , 1.1 Khz and enable Differential Encoding.

Select Demodeluator and set the bits 300 board  and Frequencies to 900Hz , 1.1 Khz and enable Differential Encoding.

Now to test your configuration.
Select the diagnose menu and then the spectrum option and then tune the APRS frequency on the Quisk SDR so that the AFSK tones is in the center of pass band section in the spectrum display below. (Center frequency is 1Khz) You can also then check if you Radio audio frequency is flat. (Both peeks is the same high)


Move your mouse cursor over display to find frequency of display. ( wait for APRS message to be received on HF)

Adjust the Quisk SDR frequency until the APRS signal is across the 1Khz frequency. see above


That's it, your soundmodem is configured.

here is a copy of my soundmodem configuration file /etc/ax25/soundmodem.conf that was generated with soundmodemconfig application.

<?xml version="1.0"?>
<modem>

 <configuration name="HF_300Board">
<chaccess txdelay="150" slottime="100" ppersist="40" fulldup="0" txtail="10"/>
<audio type="alsa" device="plughw:Loopback,1,0" halfdup="0" capturechannelmode="Mono"/>
<ptt file="none" gpio="0" hamlib_model="" hamlib_params=""/>
<channel name="Channel 0">
<mod mode="afsk" bps="300" f0="900" f1="1100" diffenc="1" ifname="sm0" hwaddr="ZR6AIC-2" ip="10.0.0.1" netmask="255.255.255.0" broadcast="10.0.0.255"/>
<demod mode="afsk" bps="300" f0="900" f1="1100" diffdec="1"/>
<pkt mode="KISS" ifname="sm0" hwaddr="ZR6AIC-2" ip="10.0.0.1" netmask="255.255.255.0" broadcast="10.0.0.255" file="/dev/soundmodem0" unlink="0"/>
</channel>
</configuration>
</modem>


You will need some test audio so here is a video of a message that was recorded. Play it back and see if your modem is setup coorectely.


After your testing you will the close the soundmodemconfig Application and then run it as a soundmodem daemon in the background.

Close the soundmodemconfig application by clicking on the X on top.

then run the deamon sudo soundmodem&

4) Install Xastir. ( APRS IGate and map viewer)


Now lets setup the iGate of your APRS demodulated data to the internet
Install Xastir
sudo apt-get install xastir

run xastir

sudo xastir

Configure the Xastir to get the serial data from your sound modem
Select the interface menu


Now select the add  button and then then the Serial KISS TNC option

The TNC port has to be /dev/soundmodem0 as we configured in the soundmodem setup above

Then setup your internet APRS server details.

Save en setup your station detail.
Select file menu and then configeration.

Update your IGate details and station info see below.


Save your station configuration.
Now start Device 0 and Device 1 in the Interface menu and if all is well the interface will change to the up state.


If all the interfaces when up you should see your IGate on the internet. http://aprs.fi


How to install Gqrx SDR software on Linux using your RTL dongle or Softrock receivers.

$
0
0
How to install the Gqrx SDR software on Linux using your RTL dongle or Softrock receivers. (Ubuntu)

RTL _dongle

The RTL Dongles is available from http://www.giga.co.za/ocart/index.php?route=product/category&path=59_63
Gqrx SDR software

Update the repository files and update your Linux to the latest versions.
sudo apt-get update
sudo apt-get upgrade

Now install the libraries ... get coffee
Now install the libraries for GQRX SDR on you Linux (Ubuntu)

sudo apt-get install cmake python-cheetah doxygen libboost-all-dev python-sphinx libfftw3-dev python-numpy libqwt-dev libgsl0-dev python-wxgtk2.6 qtcreator libpulse-dev swig libcppunit-dev libusb++-dev libusb-dev libusb-1.0-0-dev maybe some more coffee ;-)

Build and Install GNU Radio libraries


Create a directory where you will install the SDR software in your favorite install directory.
mkdir gqrx
goto directory you created.
cd gqrx
get the gnuradio source code
git clone http://git.gnuradio.org/git/gnuradio.git
if you are using the ould git before 1.6 then use this command
git clone git://gnuradio.org/gnuradio
You should see
Cloning into 'gnuradio'...
got to the newly created directory gnuradio when the cloning is done
cd gnuradio
make a build directory
mkdir build
goto the build directory
cd build
Compile gnuradio
cmake ../
if you get an error -- WARNING: Found a known bad version of Boost (v104601). Disabling.
Then run cmake -DENABLE_BAD_BOOST=True ../
This can take a couple of hours depending on the speed of you Linux server.
make
Now install the newly compiled binaries into the required directories
sudo make install
Now load the the gnu drivers
sudo ldconfig

Build and Install RTL-SDR drivers
go to your favorite install directory
cd ../../../
get the latest source code from osmocom.org
git clone git://git.osmocom.org/rtl-sdr.git
go to the newly created directory
cd rtl-sdr/
Now compile the rtl drivers
create the build directory
mkdir build
go to the build directory
cd build
compile the code
cmake ../
make
now install the compiled binaries
sudo make install
load the drivers
sudo ldconfig

now copy the content of the file rtl-sdr.rules and append it to the /etc/udev/rules.d/70-persistent-cd.rules file

use your favorite editor

vi rtl-sdr.rules and copy the content.

then open the file /etc/udev/rules.d/70-persistent-cd.rules

sudo vi /etc/udev/rules.d/70-persistent-cd.rules and append the previous files content at the end

This is how my file looked like

# This file maintains persistent names for CD/DVD reader and writer devices.
# See udev(7) for syntax.
#
# Entries are automatically added by the 75-cd-aliases-generator.rules
# file; however you are also free to add your own entries provided you
# add the ENV{GENERATED}=1 flag to your own rules as well.
# hp_DVD_RW_AD-7581S (pci-0000:00:1f.2-scsi-0:0:0:0)
SUBSYSTEM=="block", ENV{ID_CDROM}=="?*", ENV{ID_PATH}=="pci-0000:00:1f.2-scsi-0:0:0:0", SYMLINK+="cdrom", ENV{GENERATED}="1"
SUBSYSTEM=="block", ENV{ID_CDROM}=="?*", ENV{ID_PATH}=="pci-0000:00:1f.2-scsi-0:0:0:0", SYMLINK+="cdrw", ENV{GENERATED}="1"
SUBSYSTEM=="block", ENV{ID_CDROM}=="?*", ENV{ID_PATH}=="pci-0000:00:1f.2-scsi-0:0:0:0", SYMLINK+="dvd", ENV{GENERATED}="1"
SUBSYSTEM=="block", ENV{ID_CDROM}=="?*", ENV{ID_PATH}=="pci-0000:00:1f.2-scsi-0:0:0:0", SYMLINK+="dvdrw", ENV{GENERATED}="1"
#************************* below is what was appended ****************
# original RTL2832U vid/pid (hama nano, for example)SUBSYSTEMS=="usb", ATTRS{idVendor}=="0bda", ATTRS{idProduct}=="2832", MODE:="0666"
# ezcap EzTV668 (E4000)SUBSYSTEMS=="usb", ATTRS{idVendor}=="0bda", ATTRS{idProduct}=="2838", MODE:="0666"
# Terratec Cinergy T Stick Black (rev 1) (FC0012)SUBSYSTEMS=="usb", ATTRS{idVendor}=="0ccd", ATTRS{idProduct}=="00a9", MODE:="0666"
# Terratec NOXON rev 1 (FC0013)SUBSYSTEMS=="usb", ATTRS{idVendor}=="0ccd", ATTRS{idProduct}=="00b3", MODE:="0666"SUBSYSTEMS=="usb", ATTRS{idVendor}=="0ccd", ATTRS{idProduct}=="00b4", MODE:="0666"SUBSYSTEMS=="usb", ATTRS{idVendor}=="0ccd", ATTRS{idProduct}=="00b7", MODE:="0666"SUBSYSTEMS=="usb", ATTRS{idVendor}=="0ccd", ATTRS{idProduct}=="00c6", MODE:="0666"
# Terratec Cinergy T Stick RC (Rev.3) (E4000)SUBSYSTEMS=="usb", ATTRS{idVendor}=="0ccd", ATTRS{idProduct}=="00d3", MODE:="0666"
# Terratec T Stick PLUS (E4000)SUBSYSTEMS=="usb", ATTRS{idVendor}=="0ccd", ATTRS{idProduct}=="00d7", MODE:="0666"
# Terratec NOXON rev 2 (E4000)SUBSYSTEMS=="usb", ATTRS{idVendor}=="0ccd", ATTRS{idProduct}=="00e0", MODE:="0666"
# PixelView PV-DT235U(RN) (FC0012)SUBSYSTEMS=="usb", ATTRS{idVendor}=="1554", ATTRS{idProduct}=="5020", MODE:="0666"
# Astrometa DVB-T/DVB-T2 (R828D)SUBSYSTEMS=="usb", ATTRS{idVendor}=="15f4", ATTRS{idProduct}=="0131", MODE:="0666"
# Compro Videomate U620F (E4000)SUBSYSTEMS=="usb", ATTRS{idVendor}=="185b", ATTRS{idProduct}=="0620", MODE:="0666"
# Compro Videomate U650F (E4000)SUBSYSTEMS=="usb", ATTRS{idVendor}=="185b", ATTRS{idProduct}=="0650", MODE:="0666"# Compro Videomate U650F (E4000)SUBSYSTEMS=="usb", ATTRS{idVendor}=="185b", ATTRS{idProduct}=="0650", MODE:="0666"
# Compro Videomate U680F (E4000)SUBSYSTEMS=="usb", ATTRS{idVendor}=="185b", ATTRS{idProduct}=="0680", MODE:="0666"
# Sweex DVB-T USB (FC0012)SUBSYSTEMS=="usb", ATTRS{idVendor}=="1f4d", ATTRS{idProduct}=="a803", MODE:="0666"
# GTek T803 (FC0012)SUBSYSTEMS=="usb", ATTRS{idVendor}=="1f4d", ATTRS{idProduct}=="b803", MODE:="0666"
# Lifeview LV5TDeluxe (FC0012)SUBSYSTEMS=="usb", ATTRS{idVendor}=="1f4d", ATTRS{idProduct}=="c803", MODE:="0666"
# MyGica TD312 (FC0012)SUBSYSTEMS=="usb", ATTRS{idVendor}=="1f4d", ATTRS{idProduct}=="d286", MODE:="0666"
# PROlectrix DV107669 (FC0012)SUBSYSTEMS=="usb", ATTRS{idVendor}=="1f4d", ATTRS{idProduct}=="d803", MODE:="0666"
# Zaapa ZT-MINDVBZP (FC0012)SUBSYSTEMS=="usb", ATTRS{idVendor}=="1b80", ATTRS{idProduct}=="d398", MODE:="0666"
# Twintech UT-40 (FC0013)SUBSYSTEMS=="usb", ATTRS{idVendor}=="1b80", ATTRS{idProduct}=="d3a4", MODE:="0666"
# ASUS U3100MINI_PLUS_V2 (FC0013)SUBSYSTEMS=="usb", ATTRS{idVendor}=="1b80", ATTRS{idProduct}=="d3a8", MODE:="0666"
# Dexatek DK DVB-T Dongle (Logilink VG0002A) (FC2580)SUBSYSTEMS=="usb", ATTRS{idVendor}=="1d19", ATTRS{idProduct}=="1101", MODE:="0666"
# Dexatek DK DVB-T Dongle (MSI DigiVox mini II V3.0)SUBSYSTEMS=="usb", ATTRS{idVendor}=="1d19", ATTRS{idProduct}=="1102", MODE:="0666"# Dexatek DK 5217 DVB-T Dongle (FC2580)SUBSYSTEMS=="usb", ATTRS{idVendor}=="1d19", ATTRS{idProduct}=="1103", MODE:="0666"
# MSI DigiVox Micro HD (FC2580)SUBSYSTEMS=="usb", ATTRS{idVendor}=="1d19", ATTRS{idProduct}=="1104", MODE:="0666"
# DigitalNow Quad DVB-T PCI-E card (4x FC0012?)SUBSYSTEMS=="usb", ATTRS{idVendor}=="0413", ATTRS{idProduct}=="6680", MODE:="0666"
# Leadtek WinFast DTV Dongle mini D (FC0012)SUBSYSTEMS=="usb", ATTRS{idVendor}=="0413", ATTRS{idProduct}=="6f0f", MODE:="0666"
# Genius TVGo DVB-T03 USB dongle (Ver. B)SUBSYSTEMS=="usb", ATTRS{idVendor}=="0458", ATTRS{idProduct}=="707f", MODE:="0666"
# GIGABYTE GT-U7300 (FC0012)SUBSYSTEMS=="usb", ATTRS{idVendor}=="1b80", ATTRS{idProduct}=="d393", MODE:="0666"
# DIKOM USB-DVBT HDSUBSYSTEMS=="usb", ATTRS{idVendor}=="1b80", ATTRS{idProduct}=="d394", MODE:="0666"
# Peak 102569AGPK (FC0012)SUBSYSTEMS=="usb", ATTRS{idVendor}=="1b80", ATTRS{idProduct}=="d395", MODE:="0666"
# SVEON STV20 DVB-T USB & FM (FC0012)SUBSYSTEMS=="usb", ATTRS{idVendor}=="1b80", ATTRS{idProduct}=="d39d", MODE:="0666"
# SVEON STV21 DVB-T USB & FMSUBSYSTEMS=="usb", ATTRS{idVendor}=="2b80", ATTRS{idProduct}=="d3b0", MODE:="0666"


Building and Install gr_osmoSDR

cd ../../
git clone git://git.osmocom.org/gr-osmosdr
cd gr-osmosdr/
mkdir build
cd build/
cmake ../ -Wno-dev
make
sudo make install
sudo ldconfig

Building and Install Gqrx


cd ../../
git clone https://github.com/csete/gqrx.git
cd gqrx
qtcreator ./gqrx.pro

A new window will open (the QT compiler).
When it opens click the build menu then the build all option.

QT Compiler

you should see The process "/usr/bin/make" exited normally.

Plug in your RTL dongle.
Now run gqrx.
gqrx

Select Yes
GQRX Should now be open. On the first run you will be prompted for a device listing.

Select your SDR (in my case RTL dongle)

 In the device drop down menu select "ezcap USB 2.0 DVB-T/DAB/FM Dongle", then continue to the main GQRX window.

Select File->Start DSP. You should now be receiving something.
Tune to a local radio station between 88-108Mhz FM.
select Wide FM Stero as the Mode Type.


Now connect a proper external antenna to your RTL dongle or Softrock HF/VHF kit.
Hope you have lost of fun ;-)

Here is a video of GQRX using the 100Khz to 17Ghz RTL dongle in direct conversion mode.


How to configure your direct conversion dongle.

Here is the screen-shot of the configuration on Linux for Gqrx
  1. Device Select other
  2. Device String rtl=0,direct_sample=2
 
  
Device String rtl=0,direct_sample=2
Here is a picture of the 100KHX to 1.7Ghz rtl dongle
100Khz to 1.7Ghz RTL direct conversion dongle
They are available at http://www.giga.co.za/ocart/index.php?route=product/product&path=59&product_id=178

How to Setup GOIP 1/4/8 (GSM VOIP Gateway) as a Trunk gateway for Asterisk (PABX system)

$
0
0
How to Setup GOIP 1/4/8/16 .. as a Trunk gateway for Asterisk (PABX system)
The GOIP (VOIP) routers is available from http://www.giga.co.za

GOIP 1
GOIP 4


What can I do with a GOIP?

With one GOIP device you can do the following.
1) Dial from GSM Cellphone and PSTN land line to a SIP (VOIP) phone.
2) Dail from SIP to GSM Cellphone and PSTN line.
3) GOIP can and act as a trunk gateway for Asterisk (PABX)


With two and more GOIP devices. (Branch to Branch local dial cost)


Here is the setup procedure for the GSM/PSTN to SIP and SIP GSM/PSTN

1) Install a local GSM SIM  from your local GSM network provider ( MTN or Vodacom ....) make shore there is airtime on the SIM and you know what is the Cell number.

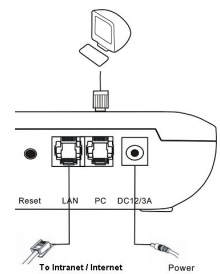
2) Connect the GOIP to your internet router with  ethernet cable. (Router should have DHCP enabled)


2) You know need to find out what IP was allocated to your GOIP by your Internet router.
There are two ways to establish the GOIP IP.
  • Dial the SIM number of anyone of the GSM channels available. Once the cal is answerd dial “*01” to hear voice prompt reporting the LAN port IP address.
  • Send the “#INFO#” SMS message command to of the GSM channels available. The GoIP will then return back the LAN port IP address.  E.G. 192.168.1.130
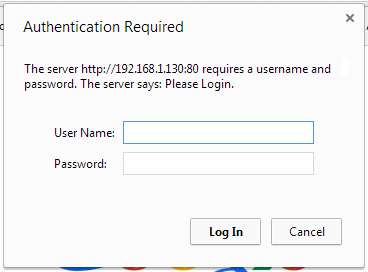
3) Now that you know what your GOIP IP is just use your browser and point it to the IP for example http://192.168.1.130

4) You should get a login popup, the default login username and password is admin admin.

5) After login you should see a admin home page.


6) We now need to configer the GOIP (SIP200) to foreword incoming GSM calls to cell number to a SIP numbers (My SIP number at home (101) and on my Android phone(100).
The problem is that the GOIP can only foreword to one SIP number.
So what I did is foreword it to a SIP number on my Asterisk server and allowed the Asterisk to foreword to both SIP phones (100,101). (see diagram below)


6) We now need to set up the Goip to call a SIP (VOIP) number when a call comes in from GSM network.
Click on the Configurations menu on the left.
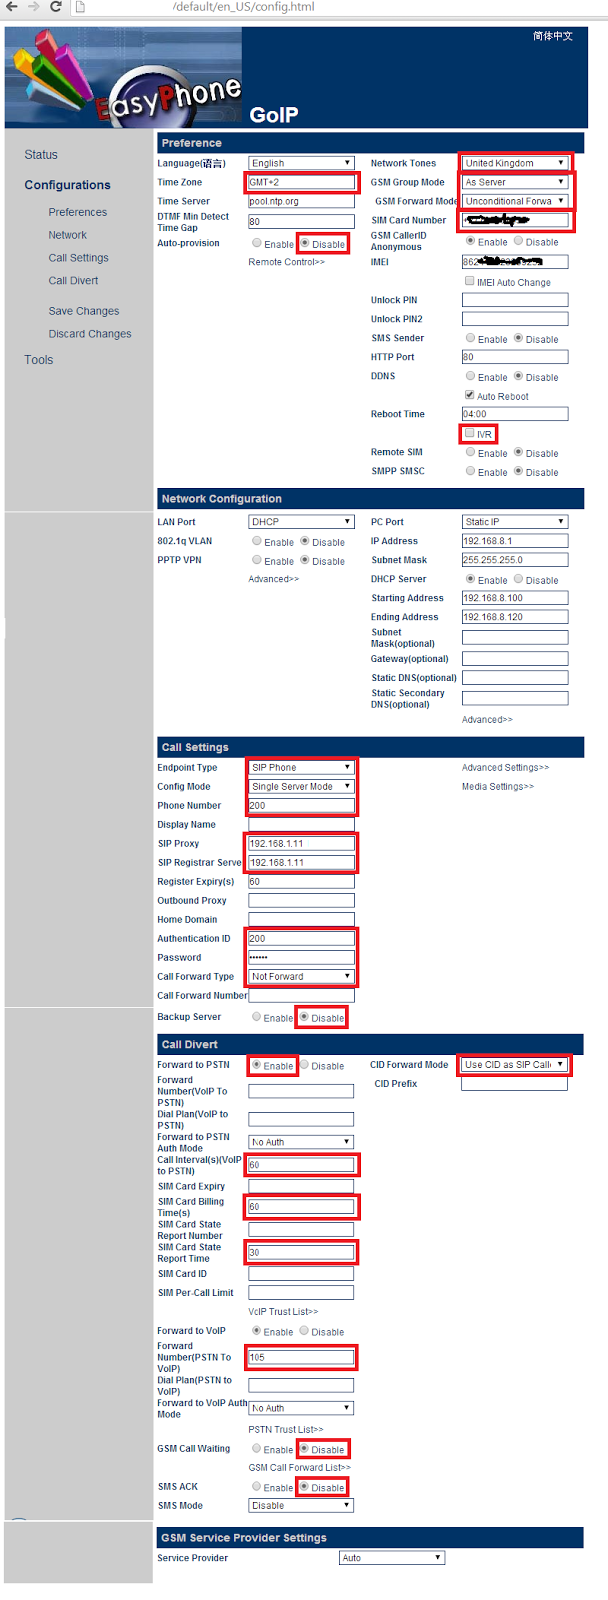
6.1) I had to give the GOIP a SIP number (200) so that the GOIP can register to Asterisk.
6.2) I had to add a SIP number to GOIP to foreword all incoming GSM calls to a SIP number (105)
6.3) I had to add the Asterisk server IP 192.168.1.11 (substitute your IP)
6.4) and set the rest as in the RED config options below.
GOIP1 Configuration for GSM call forwording to SIP on Asterisk.
7) Next we need to configure Asterisk to allow GOIP1 to register its SIP 200 number and setting up Asterisk to foreword the incoming call to both my SIP app on android as well as my SIP client on My laptop or my Desktop SIP phone.
7.1) Login into you Linux server using your command  terminal (Ubuntu in my case)
7.2) Install Asterisk 
sudo apt-get update
when its complete the install asterisk
sudo apt-get install asterisk
When it is complete we now need to configure Asterisk to allow GOIP to connect to a SIP and to setup asterisk to foreword incoming and outgoing calls to and from Goip.
There is two files that needs editing. sip.conf and extensions.conf
 change to the asterisk config directory /etc/asterisk directory
cd /etc/asterisk
now edit the sip.conf file with your favorite editor
sudo vi sip.conf

add this example to your (/etc/asterisk/sip.config) file
sudo vi /etc/asterisk/sip.config


[200]
type=friend
secret=gioppassword ;NOTE it is important to set up a complex password
qualify=no ; Will not drop the connection
nat=yes ; This phone may be outside the network
host=dynamic ; This device registers with us
canreinvite=no ; Asterisk by default tries to redirect
context=GVOIP ; Or whatever context you want to define in Asterisk
mailbox=200@default ; only if you are configuring voicemail.

now add the following to your extensions.conf file (/etc/asterisk/extensions.conf)
sudo vi extensions.conf

in the [general] section add the following  (only numbers in South Africa)

exten => _0[1,8,7]XXXXXXXX,1,Dial(SIP/200/${EXTEN})
and create GOIP section as below

[GOIP]
#incoming GOIP call
exten => s,1,Wait(1)
exten => s,n,Answer
exten => s,n,Playback(beep)
exten => s,n,Dial(SIP/101&SIP/102&SIP/103);Dail my Sip app on cell phone and my Sip desktop
exten => s,n,Hangup

Save files

Now restart  asterisk

 sudo /etc/init.d/asterisk stop
 sudo /etc/init.d/asterisk start

now monitor asterisk and test your Goip dail from GSM and dialing from you sip phone to any number in south africa.

sudo asterisk -rvvvvvvv


you should see your connection on the terminal

hope this help

Please note the GOIP units is Available from http://www.giga.co.za
Viewing all 69 articles
Browse latest View live